Tuesday, 24 February 2009

Making a Nappy (Diaper) Wrap from the Rita's Rump Cover Pattern


For this nappy wrap (cover) I am using the Rita's Rump Cover pattern (http://handmadebyrita.blogspot.com/2007/10/httpwww.html).

To make this cover you will need -

Fleece fabric - about half a yard, or two different quarter-yards.
Some elastic.
Polyester thread. Do not use cotton thread as it will wick any moisture through to the outside of the wrap!
A sewing machine - preferably with a straight stitch and a 3-step zigzag stitch but any sewing machine will do!
Velcro/Aplix.
Poly/cotton piping.

1 - Draw around the cover pattern on the wrong side of your inner fabric (mine is a plain microfleece), then cut out, adding an extra half inch all the way around. The cutting doesn't have to be perfect as you are going to sew along the drawn line. Make sure you mark your elastic start and end points on your pattern, in the seam allowance.


2 - Place your inner piece right-sides-together with your outer fabric and cut out.


3 - Make your tabs. You can either simply cut two pieces of hook tape, each about 1.5 - 2" long and cut the edges into a curve, or make the more complicated but softer tabs as follows...

Take your Aplix and cut two pieces of hook and two pieces of loop, each about 1.5 - 2" long. Keep them stuck together for now. Cut the edges into curves at one end, so they look like this:


Take a piece of poly/cotton piping.


Open up your Aplix. Place the pieces back to back (one hook piece and one loop piece), catching the piping between the layers to make an edging.


Stitch around the edge of your Aplix, ensuring you catch both layers of Aplix and the piping. I sew around the Aplix once with a straight stitch ...


... then I turn around and sew back around the edge from the other direction, using a zigzag stitch and making sure half of the stitch is on the Aplix and the other half is on the piping.


Each tab should look something like this.

4 - Now to elasticate one of the leg holes. Take your elastic. I usually use clear elastic for nappies, but braided elastic works really well with this pattern. Here I have some ordinary quarter-inch elastic from the local sewing shop. Do not cut the elastic yet! Put the elastic on your nappy inner fabric, on the outside of the drawn line - actually in the seam allowance. Make sure about an inch of elastic is before the elastic start mark that you drew in step 1. Put your sewing machine on the 3-step-zigzag stitch (or normal zigzag if you don't have a 3-step). Starting at the elastic start mark, stitch in reverse for an inch, then forwards for an inch, without stretching the elastic or fabric. This anchors your elastic in place.

5 - Make sure your needle is down in the fabric before you do the next bit! Pull your elastic hard and keep it stretched as hard as you can while you sew along it, keeping the elastic just outside the drawn line on your fabric. Do not stretch or pull the fabric as you do this.
When you reach the elastic finish mark at the other end of the nappy, stop. Don't stretch the elastic. Sew one more inch, then sew backwards for one inch, to anchor this end of the elastic well. Cut off the excess elastic.
6 - Repeat steps 4 and 5 for the other leg elastic and the back elastic. Your nappy inner should now look roughly like this.

7 - Place the tabs on the nappy wings on the right side of the outer fabric, with the loop side facing downwards. Pin your inner layer on top of your outer layer, right sides together, stretching the elastic as you pin, so they fit together.


8 - Remember during this next part that we are going to leave a large gap at the front edge of the nappy, to enable us to turn the whole thing the right way out! Change to a straight stitch on your sewing machine. Stitch along the drawn line on your inner fabric, stretching the elastic as you go past it, and making sure that you do NOT catch any of the elastic in your stitching. I sew slightly inside the drawn line as I go past the elastic.


Remember to leave that gap!!

Your nappy wrap should now look something like this.

9 - Trim the seams around the corners and past the elastic, fairly close to the stitching. Do not trim along the bottom (the front of the wrap) or you'll make it very difficult to stitch together.

10 - Turn your wrap the right way round by pushing it through the open gap. Make sure you push all the curves out neatly. Your wrap should now look like this

11 - Nearly finished!! You need to close the gap. Fold the edges inside and pin them together neatly. Starting to one side of the gap, stitch all around the edge of the wrap. For most of the wrap you stitch very close to the edge.
When you get to the elastic, do not stitch close to the edge. Move inwards, stretch the elastic and sew along the wrap just inwards from where the elastic is. This creates a nice little channel for the elastic and gives a lovely neat finish to the leg edges.

12 - Your wrap should now look like this.


13 - Cut a piece of Aplix (loop side) to fit the front of your wrap. Set your sewing machine to a zigzag stitch and sew the Aplix on.


14 - Sew in your ends of thread and admire your new nappy wrap!

Monkey Set for Baby H

My next project is a set for the baby, who is 8.5 months old at the moment. I have some lovely green flannel with monkeys on it, and matching fleece, plus some co-ordinating spotty flannel. I'm planning to make her:

1 Rita's Rump pocket nappy - monkey flannel on the outside and dotty flannel on the inside.

1 Rita's Rump cover - monkey fleece on the outside and white microfleece on the inside.

1 embellished vest - a bought vest with some of the monkey flannel appliqued on the front.

2 embellished infant prefolds, to be used as inserts for the pocket nappy, since she's too big for them now!

I'll update here as I make them, and if I have the time I might do a tutorial for the wrap and pocket nappy too.

Here are the materials, all ready!!

Sunday, 22 February 2009

So proud of my "pupils"!!

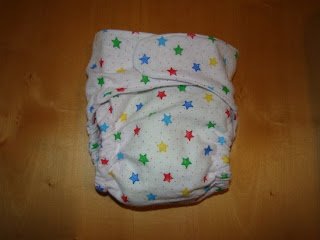
One of my friends who admits to being "sewing challenged" tried using the cloth nappy tutorial to make her daughter a beautiful starry nappy. Look! It's gorgeous!


If anyone else has used the tutorial, I'd love to know how the nappy turned out!

Sunday, 15 February 2009

YCMT Quilt - Looking Good!

I've been putting off doing more to my quilt because I have so little sewing time and I always feel that I need to get each project exactly right or not do it at all. However, from now on I'm adopting the phrase "done is better than perfect" which I think I read at Rostitchery (http://rowena.typepad.com/) as my new motto. Today I had the opportunity, so I sat down at the machine, baby on lap for part of the time, although I got more done when she fell asleep and I put her in the pram!

Here are the pinwheels all sewn together. Not exactly perfect, but definitely done!


Here it is with edges added. Not pressed!


So - have I caught up?!

Friday, 6 February 2009

Making a Fitted Nappy (Diaper) from the Rita's Rump Pocket Diaper Pattern


For this nappy I am using the Rita's Rump Pocket Diaper pattern (http://handmadebyrita.blogspot.com/2007/10/classic-rrp-ritas-rump-pocket-pattern.html), but adapting it to make a fitted nappy instead of a pocket. I've worked out my own pattern for the inner soaker pad, which I also use to make lay-in doublers for heavy-wetting babies.

To make this nappy you will need -
Just over half a yard of flannel fabric.
Half a yard of microfibre fabric (or a couple of microfibre cloths, or half a yard of terry towelling...).
Some elastic.
Thread.
A sewing machine - preferably with a straight stitch and a 3-step zigzag stitch but any sewing machine will do!

You can add poppers (snaps) or Velcro/Aplix, but I'm not showing how to do that today. This nappy will be fastened with a pin or a Snappi.

1 - Cut around the nappy body pattern from your outer fabric (mine is a patterned cotton flannel), adding an extra half inch all the way around. This doesn't have to be perfect.


You may notice that I have cut out an inner soaker pad shape too, to use as the top of the matching doubler It fits well below the wing of the nappy ... economising on fabric. I usually cut the remnant from the other side into an oval shape, stitch it to some terry fabric and use it as a matching wipe.

2 - Cut out another piece exactly the same from the fabric you want to use for your inside layer. I'm using some lovely soft cream flannel.


Cut out 3 layers of microfibre for the nappy's inner soaker pad, and two or three for the doubler if you're making it. You can work out a shape that suits you, or use mine... the 2 PDF files containing the pattern are here.http://www.mediafire.com/?fo0kdwoyumz and
http://www.mediafire.com/?gdgozmde430


3 - Place the paper pattern centrally onto the wrong side of your inside layer and weight it down.
Draw around the edge, making sure you mark where the elastic will begin and end (triangles on the pattern), and the long gap at the top for turning.

4 - Place the three layers of microfibre centrally on the wrong side of the inner layer.
If your sewing machine has a 3-step zigzag stitch, like stitch C on my machine ...
... select it now. Stitch around the edge of the soaker pad, making sure you sew through all three layers.

When you turn your nappy inner over now it should look like this.
5 - Take your elastic. I usually use clear elastic for nappies, but braided elastic works really well with this pattern. Here I have some ordinary quarter-inch elastic from the local sewing shop. Do not cut the elastic yet!
Put the elastic on your nappy inner fabric, on the outside of the drawn line - actually in the seam allowance. Make sure about an inch of elastic is before the elastic start mark that you drew in step 3. Keep your sewing machine on the 3-step-zigzag stitch. Starting at the elastic start mark, stitch in reverse for an inch, then forwards for an inch, without stretching the elastic or fabric. This anchors your elastic in place.

6 - Make sure your needle is down in the fabric before you do the next bit! Pull your elastic hard and keep it stretched as hard as you can while you sew along it, keeping the elastic just outside the drawn line on your fabric. Do not stretch or pull the fabric as you do this.
When you reach the elastic finish mark at the other end of the nappy, stop. Don't stretch the elastic. Sew one more inch, then sew backwards for one inch, to anchor this end of the elastic well.

Cut off the excess elastic.

7 - Repeat steps 5 and 6 for the other side.

Your nappy should now look roughly like this.
8 - Place your nappy inner and nappy outer right-sides together and pin them together, stretching the elastic as you do, so that both sides are pinned together correctly.
9 - Change to a straight stitch on your sewing machine. Stitch along the drawn line on your nappy inner, stretching the elastic as you go past it, and making sure that you do NOT catch any of the elastic in your stitching. I sew slightly inside the drawn line as I go past the elastic. Remember not to sew the gap at the top!!

Your nappy should now look like this.
10 - Trim the seams around the corners and past the elastic, fairly close to the stitching. Do not trim along the top (the back of the nappy) or you'll make it very difficult to stitch together!
11 - Turn your nappy the right way round by pushing it through the open gap. Make sure you push all the curves out neatly
Your nappy should now look like this.
12 - Nearly finished!! You need to close the gap at the top. Fold the edges inside and pin them together neatly. Starting at the top left, stitch all around the edge of the nappy. For most of the nappy you stitch very close to the edge. When you get to the elastic, do not stitch close to the edge. Move inwards, stretch the elastic and sew along the nappy just inwards from where the elastic is. This creates a nice little channel for the elastic and gives a lovely neat finish to the leg edges.

13 - Sew your ends of thread in and admire your new nappy!


To make the matching doubler, place your flannel layer and microfibre layers right-sides together. Stitch around the edges, leaving a gap at one end. Turn the right way in. Fold the edges of the gap in and pin. Stitch all around the edges.